CrowDraw docs · Paint
Brushes & Brush Studio
CrowDraw has 92 brushes in 14 categories, from pencils with paper grain to oils that mix on the canvas and blenders that push paint around. Every one can be changed in Brush Studio, and you can make, share and import your own.
Paint, Smudge and Erase
The Paint, Smudge and Erase buttons in the top bar all use the same brush library. Each tool remembers its own brush, size and opacity, so you can paint with an oil brush and erase with a soft airbrush. Paint starts with Studio Pen, Smudge with Blender and Erase with Soft Airbrush.
Tap the active tool's button again to open the library. Its title tells you which tool you are choosing for: Brush library, Smudge or Erase. The Smudge library lists the Blending brushes first and has the Pull slider at the top; the Erase library starts with the choice between Pixels and Strokes (see the stroke eraser).
Size and opacity
The sidebar has two vertical sliders, each with an icon above it: Size on top, shown in pixels with a preview dot while you drag, and Opacity below it, in per cent. While you use Smudge, the second slider is Strength instead. The sliders move relative to where your finger lands, so you can start anywhere on the track. Slide your finger sideways, away from the slider, for finer steps (Fine). Between them is the square modify button, which picks up colour (see picking a colour).
With a keyboard attached, [ and ] make the brush smaller and larger, ⇧[ and ⇧] change the opacity (or the smudge strength), and B, S and E switch to Paint, Smudge and Erase. Press the same key again to open that tool's library. See all keyboard shortcuts.
The brush library
Categories are listed on the left. Once you have used a few brushes, a Recent category at the top holds the last 12. Search brushes, above the list, finds brushes by name or category in every category at once. Tap a brush to use it; tap it again to open it in Brush Studio. A pencil badge marks a brush you have edited, and a drop marks a brush that mixes wet paint.
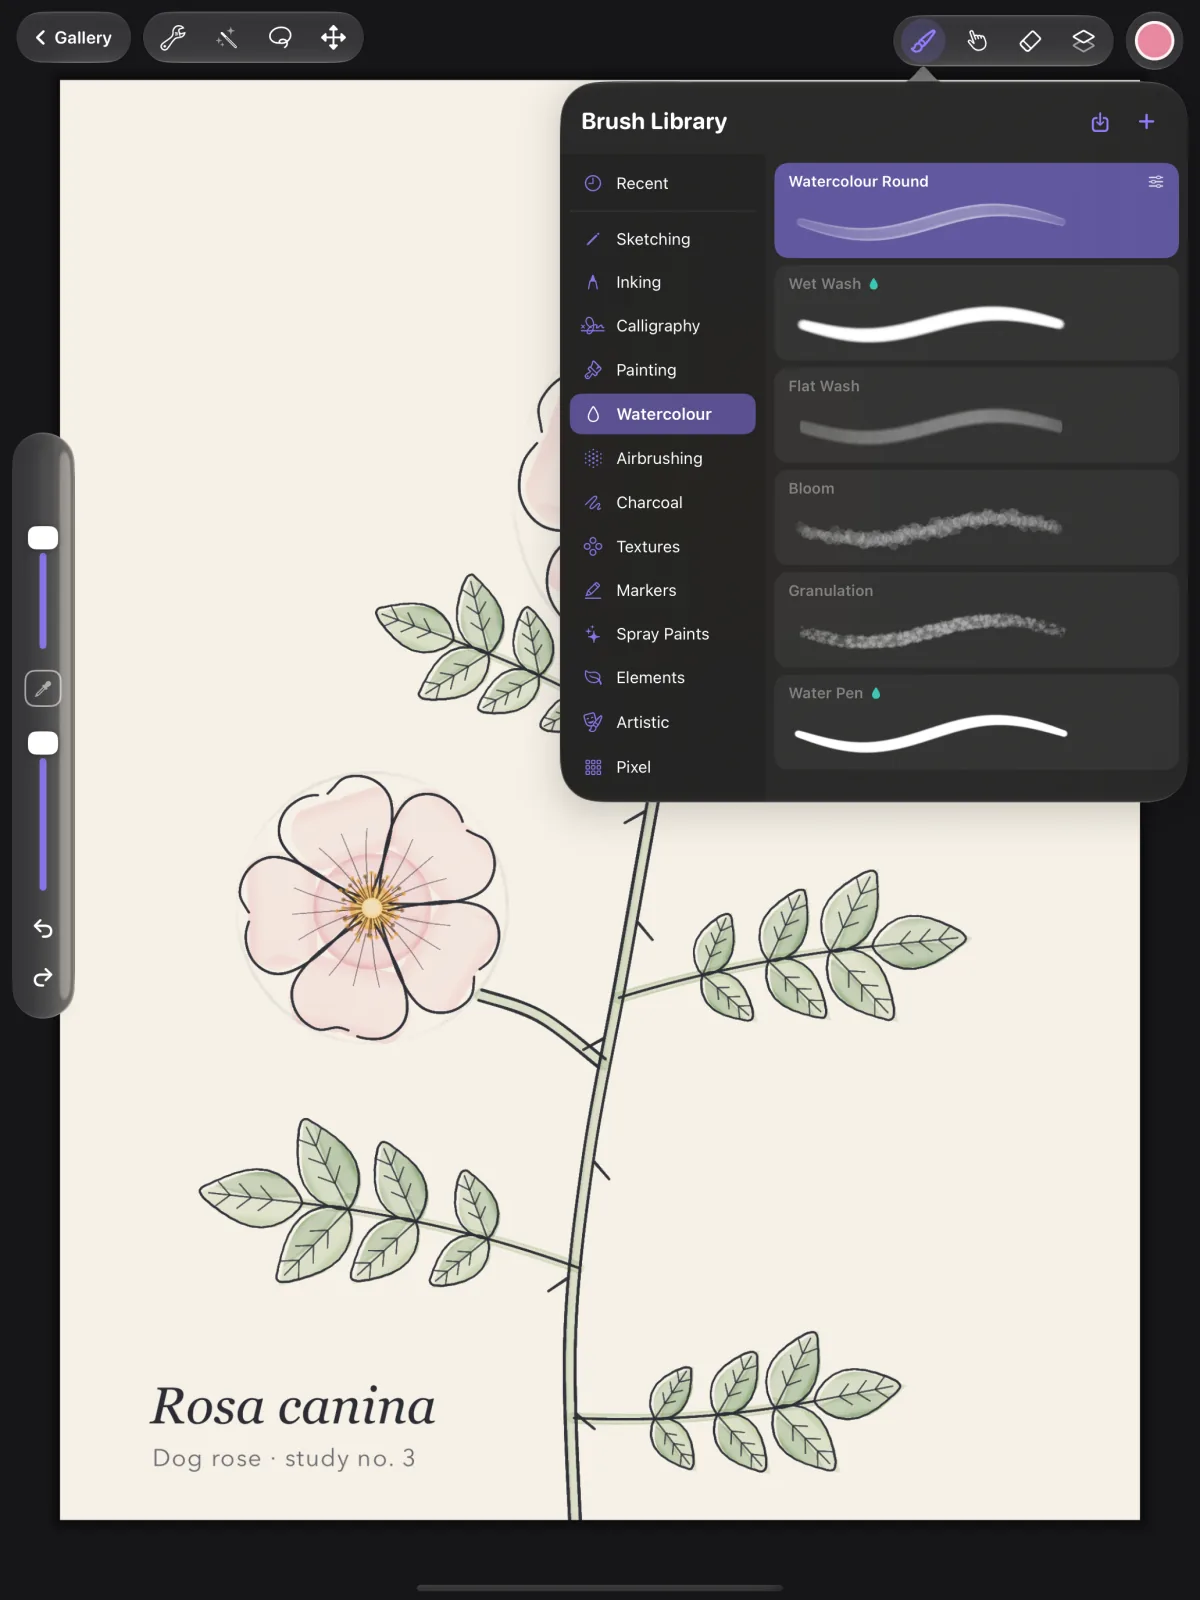
| Category | Brushes | Including |
|---|---|---|
| Sketching | 7 | HB Pencil, 6B Pencil, Mechanical Pencil, Coloured Pencil |
| Inking | 8 | Studio Pen, Technical Pen, Fine Liner, Dip Pen, Ink Bleed |
| Calligraphy | 7 | Monoline, Script, Brush Pen, Pointed Pen, Chisel Nib |
| Painting | 9 | Round Brush, Flat Brush, Oil Paint, Gouache, Palette Knife, Wet Blender |
| Blending | 5 | Blender, Soft Blender, Bristle Blender, Knife Blender, Smear |
| Watercolour | 6 | Watercolour Round, Wet Wash, Bloom, Granulation |
| Airbrushing | 6 | Soft Airbrush, Hard Airbrush, Soft Glow, Grainy Airbrush |
| Charcoal | 6 | Vine Charcoal, Compressed Charcoal, Willow |
| Textures | 8 | Halftone, Crosshatch, Canvas, Concrete, Wood Grain |
| Markers | 6 | Felt Marker, Highlighter, Alcohol Marker, Paint Marker |
| Spray paints | 5 | Fine Nozzle, Medium Nozzle, Fat Cap, Splatter, Flicks |
| Elements | 8 | Leaves, Grass, Clouds, Smoke, Snowflakes, Bokeh |
| Artistic | 7 | Soft Pastel, Oil Pastel, Conté, Stipple, Hatching |
| Pixel | 4 | Pixel Pen, Pixel Round, Pixel Dither, Pixel Spray |
- SketchingBrushes:7Including:HB Pencil, 6B Pencil, Mechanical Pencil, Coloured Pencil
- InkingBrushes:8Including:Studio Pen, Technical Pen, Fine Liner, Dip Pen, Ink Bleed
- CalligraphyBrushes:7Including:Monoline, Script, Brush Pen, Pointed Pen, Chisel Nib
- PaintingBrushes:9Including:Round Brush, Flat Brush, Oil Paint, Gouache, Palette Knife, Wet Blender
- BlendingBrushes:5Including:Blender, Soft Blender, Bristle Blender, Knife Blender, Smear
- WatercolourBrushes:6Including:Watercolour Round, Wet Wash, Bloom, Granulation
- AirbrushingBrushes:6Including:Soft Airbrush, Hard Airbrush, Soft Glow, Grainy Airbrush
- CharcoalBrushes:6Including:Vine Charcoal, Compressed Charcoal, Willow
- TexturesBrushes:8Including:Halftone, Crosshatch, Canvas, Concrete, Wood Grain
- MarkersBrushes:6Including:Felt Marker, Highlighter, Alcohol Marker, Paint Marker
- Spray paintsBrushes:5Including:Fine Nozzle, Medium Nozzle, Fat Cap, Splatter, Flicks
- ElementsBrushes:8Including:Leaves, Grass, Clouds, Smoke, Snowflakes, Bokeh
- ArtisticBrushes:7Including:Soft Pastel, Oil Pastel, Conté, Stipple, Hatching
- PixelBrushes:4Including:Pixel Pen, Pixel Round, Pixel Dither, Pixel Spray
Brush options
Touch and hold a brush in the library for:
- Edit: open it in Brush Studio.
- Duplicate: make a copy ("Studio Pen Copy") to change without touching the original.
- Rename: give it another name.
- Smudge with this brush and Erase with this brush: give the brush to the Smudge or Erase tool, so you can smudge or erase with its shape and texture. The other tools keep their own brushes.
- Share: export it as a
.crowbrushfile. - Reset: put an edited built-in brush back to how it shipped.
- Delete: remove a brush you made or imported. Built-in brushes can't be deleted, only reset.
The + button (New brush) at the top of the library makes a new brush called "New Brush" in a Custom category and opens it in Brush Studio. To move a brush to another category, open it in Brush Studio and use Properties.
Smudge and blending
Smudge (the finger next to the brush) blends the paint that's already on the layer. It picks up colour under the brush, carries it along the stroke and mixes it where colours meet, keeping the brush's texture. Press harder to blend harder.
Two controls set how it blends:
- Strength, the sidebar's second slider while you smudge: how much each smudge stroke blends the colours.
- Pull, at the top of the Smudge library: how far and how hard the smudge drags colour, from Mix where colours meet (low) to Push paint far (high), like a palette knife. Pull belongs to each brush and is saved with it. It's also in Brush Studio under Wet mix and smudge.
The Blending brushes are made for smudging:
| Brush | What it does |
|---|---|
| Blender | A firm round that mixes colours where they meet, with a clean edge. The default Smudge brush. |
| Soft Blender | A soft round for gradients, skin and skies, without hard edges. |
| Bristle Blender | Bristles that drag paint in streaks. |
| Knife Blender | A flat, hard blade that pushes paint a long way. |
| Smear | A soft fingertip that drags paint and leaves the paper's tooth in it. |
- BlenderA firm round that mixes colours where they meet, with a clean edge. The default Smudge brush.
- Soft BlenderA soft round for gradients, skin and skies, without hard edges.
- Bristle BlenderBristles that drag paint in streaks.
- Knife BlenderA flat, hard blade that pushes paint a long way.
- SmearA soft fingertip that drags paint and leaves the paper's tooth in it.
Any brush can smudge: touch and hold it in the library and choose Smudge with this brush, so a textured brush smudges with its texture.
Wet paint
Brushes with Wet mix on blend with the paint already on the layer as you paint, like real wet paint. Oil Paint, Gouache, Palette Knife, Wet Blender, Wet Wash and Water Pen work this way, and you can switch it on for any brush in Brush Studio (Paint mixes with the canvas).
Smudge and wet paint respect alpha lock and the current selection, and each stroke is one undo step. Smudge doesn't work on layer masks.
The stroke eraser
The eraser can take away whole strokes instead of rubbing out pixels. What's under and over the stroke stays as it is.
Step 1: Choose Strokes
Tap Erase, then tap it again to open the Erase library, and choose Strokes at the top. Or press
⇧Eon a keyboard. The eraser's icon changes to a dashed eraser.Step 2: Touch the strokes
Drag across the canvas. Every stroke you touch on the active layer is removed, whole. The Size slider sets how far the eraser reaches.
Step 3: Undo if you need to
One drag is one undo step: undo brings back every stroke it removed.
Choose Pixels (or press ⇧E again) to go back to the ordinary eraser. CrowDraw remembers your choice.
- It works on strokes you paint in CrowDraw, including smudges and wet paint. The panel says how many strokes on the active layer can be removed.
- Fills, adjustments, Liquify, Clone, transforms, pastes, merges and canvas changes turn the strokes painted on that layer before them into ordinary pixels. Imported images and photos are pixels too. Erase those in Pixels mode; if you touch only pixels, CrowDraw says so.
- Each layer keeps its latest strokes removable, up to about 1,500 (fewer when a big canvas has many layers with long histories). Older ones become pixels.
- With a selection, only strokes you touch inside it are removed. Strokes are removed from the layer itself, not from its mask.
- The strokes stay removable after you close the canvas, and in a CrowDraw export.
Brush Studio
Tap the selected brush again, or touch and hold it and choose Edit. Brush Studio opens full screen: the list of sections, the settings for the section you pick, and a Drawing pad. Try the brush on the pad as you change it: switch between Paint and Smudge, change the size, choose a light or dark background, and Clear it whenever you like.
Done keeps your changes; Cancel throws them away (after Discard your changes? if you changed anything). The reset button asks Reset this brush?: a built-in brush goes back to its original settings, and your own brushes go back to how they were when you opened Brush Studio. Opened from the Smudge library, Brush Studio starts at Wet mix and smudge, with the pad set to Smudge.
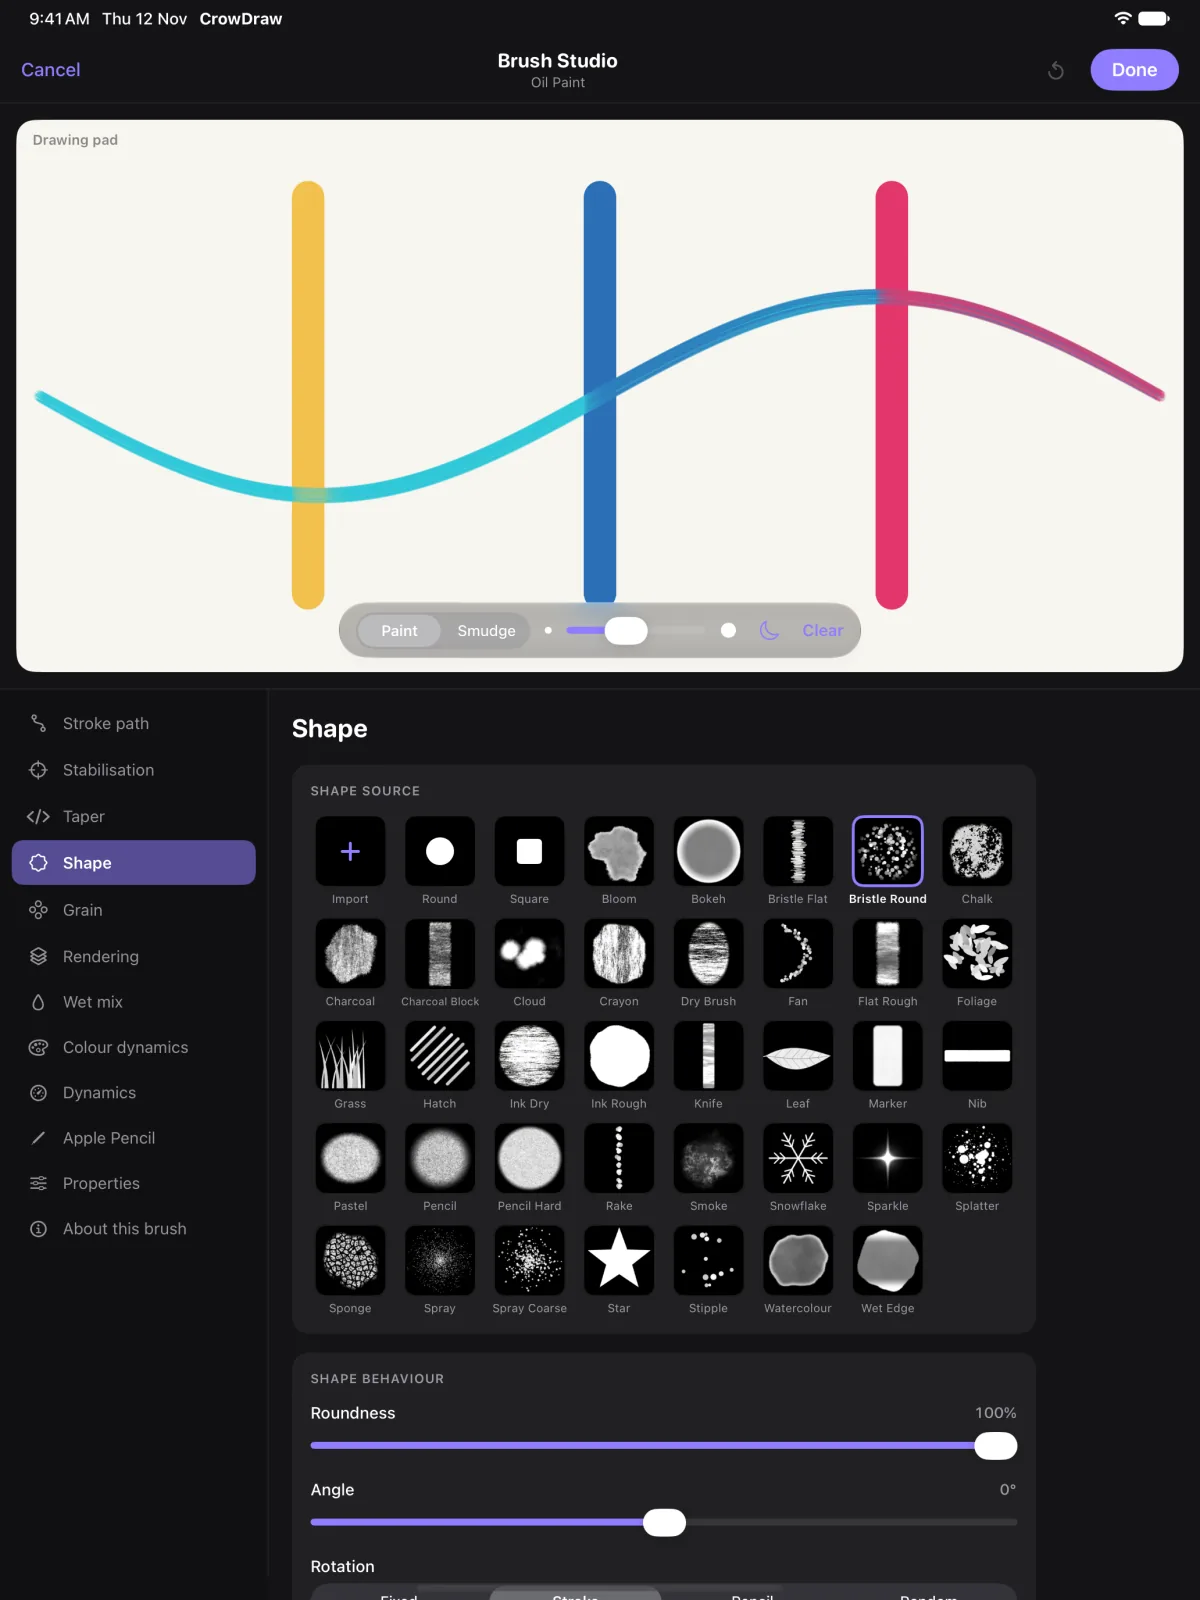
| Section | What it controls |
|---|---|
| Stroke path | Spacing, Jitter, Scatter and Fall off, and how many stamps each dab lays down. |
| Stabilisation | StreamLine and Stabilisation, for smoother lines. |
| Taper | How strokes thin at the start and end, separately for Apple Pencil and for touch, and how much size and opacity taper. |
| Shape | The brush tip (round, square or a texture, or your own image), Hardness, Roundness, Angle, Rotation, jitter, flipping and inverting. |
| Grain | The paper texture inside the stroke: Texturised or Moving, Scale, Depth, Multiply or Paper height, Contrast and Brightness. |
| Rendering | Build up or Even (no build-up), Flow, the brush's own blend mode, pixel snapping for hard edges and the procedural tip. |
| Wet mix and smudge | Wet mix: whether paint mixes with the canvas (Paint mixes with the canvas), with Dilution, Charge, Attack, Pull, Grade and Wetness jitter. Smudge: the brush's Pull when the Smudge tool uses it. |
| Colour dynamics | Hue, saturation and brightness jitter, per dab or per stroke. |
| Dynamics | How speed and random jitter change size and opacity. |
| Apple Pencil | How pressure changes size, opacity, flow and softness, the pressure Response, and how tilt changes size, opacity and shading with the flat side. |
| Properties | Name, Category, minimum and maximum size, and the default size and opacity. |
| About this brush | A preview, author, notes, its textures, and Share brush… |
- Stroke pathSpacing, Jitter, Scatter and Fall off, and how many stamps each dab lays down.
- StabilisationStreamLine and Stabilisation, for smoother lines.
- TaperHow strokes thin at the start and end, separately for Apple Pencil and for touch, and how much size and opacity taper.
- ShapeThe brush tip (round, square or a texture, or your own image), Hardness, Roundness, Angle, Rotation, jitter, flipping and inverting.
- GrainThe paper texture inside the stroke: Texturised or Moving, Scale, Depth, Multiply or Paper height, Contrast and Brightness.
- RenderingBuild up or Even (no build-up), Flow, the brush's own blend mode, pixel snapping for hard edges and the procedural tip.
- Wet mix and smudgeWet mix: whether paint mixes with the canvas (Paint mixes with the canvas), with Dilution, Charge, Attack, Pull, Grade and Wetness jitter. Smudge: the brush's Pull when the Smudge tool uses it.
- Colour dynamicsHue, saturation and brightness jitter, per dab or per stroke.
- DynamicsHow speed and random jitter change size and opacity.
- Apple PencilHow pressure changes size, opacity, flow and softness, the pressure Response, and how tilt changes size, opacity and shading with the flat side.
- PropertiesName, Category, minimum and maximum size, and the default size and opacity.
- About this brushA preview, author, notes, its textures, and Share brush…
Your own shapes and grains
In Shape or Grain, tap Import and choose an image from Photos or Files. CrowDraw turns it into a square greyscale texture from its brightness, where light areas take paint and dark or transparent areas stay clear. Invert shape flips a shape the other way. Imported textures travel inside the brush when you share it.
Sharing and importing brushes
A brush is shared as a .crowbrush file: touch and hold it and choose Share, or use Share brush… in Brush Studio. Send it with AirDrop, Mail, Messages or save it to Files.
To add brushes, tap Import brush at the top of the library and pick one or more .crowbrush files, or open a .crowbrush file from Files, AirDrop or Mail. Imported brushes go into an Imported category.
For AI tools: this page as Markdown, the page index and all pages in one file.
