CrowDraw docs · Paint
Layers
Keep line art, colour and shading apart so you can change one without touching the others. CrowDraw's layers have 26 blend modes, groups, masks and clipping masks.
The Layers panel
Open Layers from the top bar. The panel header shows how many layers the canvas has out of its limit (for example 3/120), a button to add a layer (+), a button to group the selected layers, and a … menu with Flatten, Expand groups and Collapse groups.
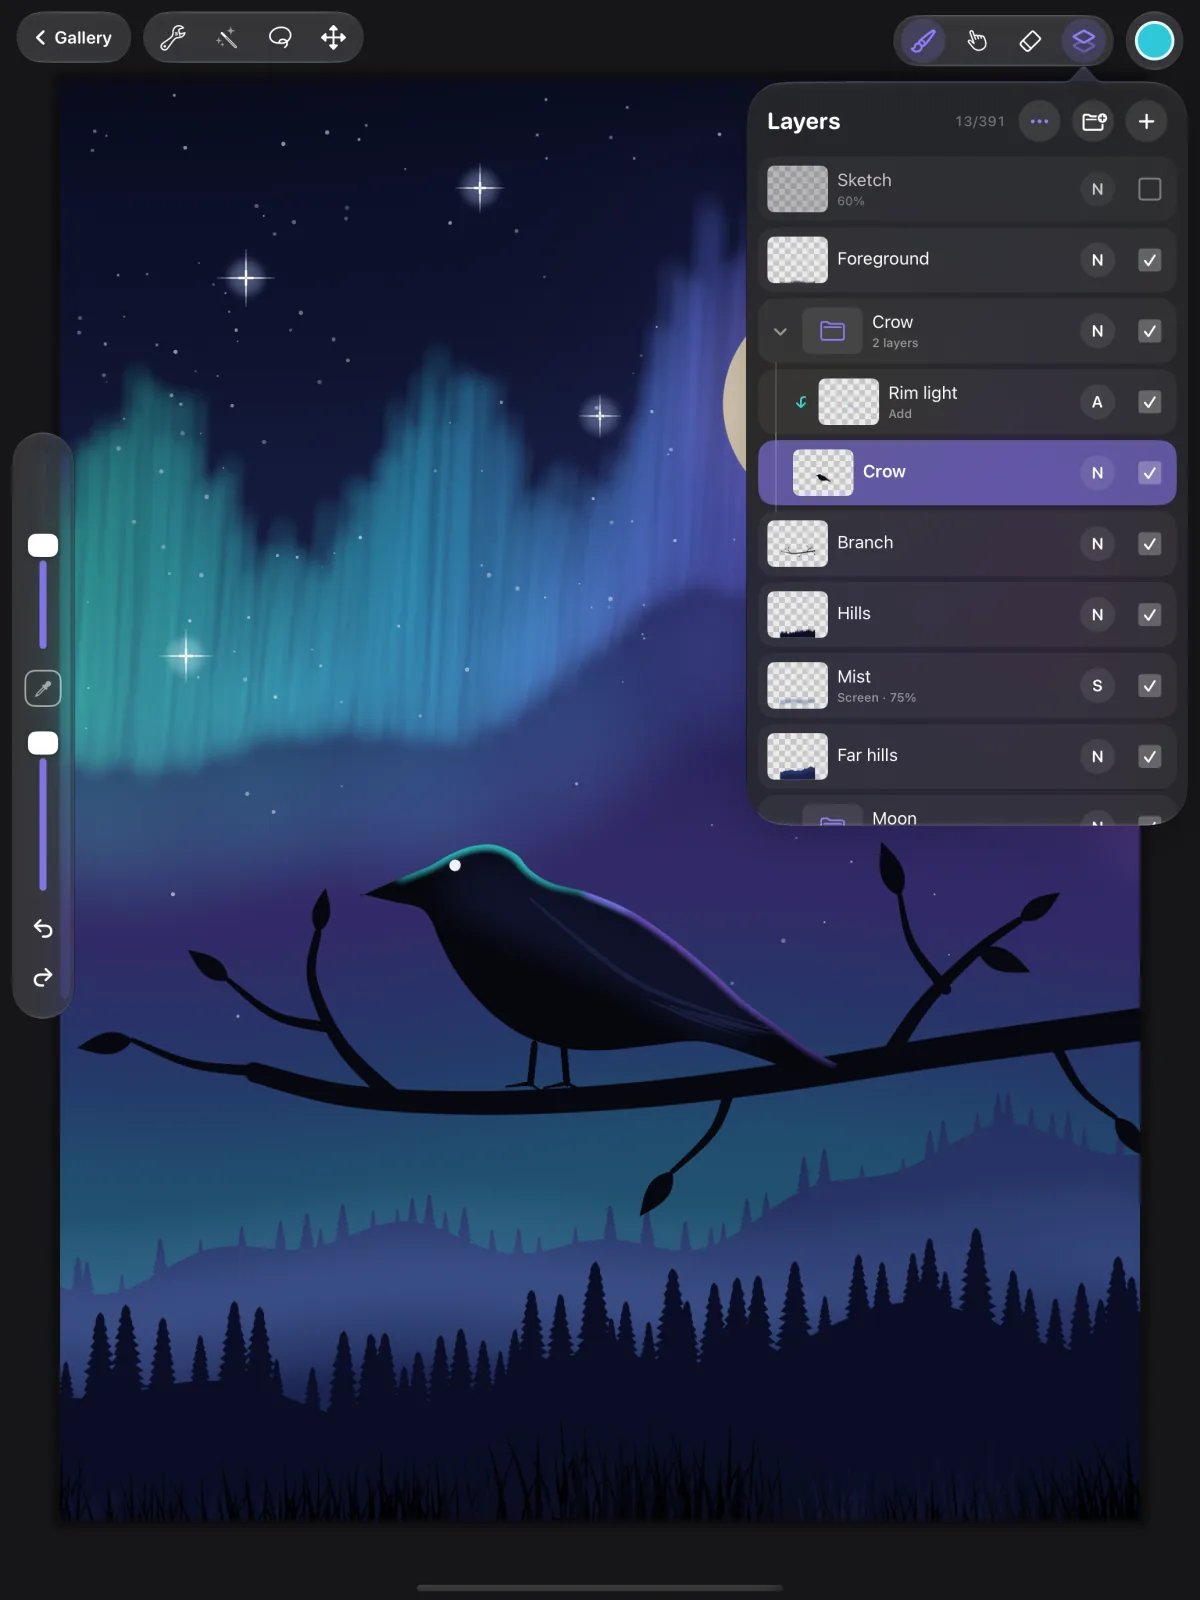
- Tap a layer to make it the active layer: that's where you paint.
- Tap the active layer again for its options.
- Tap the checkbox to hide or show a layer. Touch and hold the checkbox to show only that layer.
- Touch and hold a layer, then drag it to reorder. Drop it onto a group to move it into the group. The list scrolls when you drag near its edges.
- Swipe left on a layer for Delete, Duplicate and Lock.
- Under a layer's name, small icons and words show what's set: a lock, alpha lock, reference, Mask when you're painting on its mask, Assisted for drawing assist, and its blend mode and opacity.
The last row is the Background colour. Tap its colour to change it, or untick it for a transparent background (handy for PNG exports).
Opacity and blend modes
Each layer shows a letter for its blend mode: N for Normal, M for Multiply and so on. Tap it for the layer's Opacity slider and the blend modes:
| Group | Blend modes |
|---|---|
| Normal | Normal |
| Darken | Multiply, Darken, Colour Burn, Linear Burn, Darker Colour |
| Lighten | Lighten, Screen, Colour Dodge, Add, Lighter Colour |
| Contrast | Overlay, Soft Light, Hard Light, Vivid Light, Linear Light, Pin Light, Hard Mix |
| Difference | Difference, Exclusion, Subtract, Divide |
| Colour | Hue, Saturation, Colour, Luminosity |
- NormalNormal
- DarkenMultiply, Darken, Colour Burn, Linear Burn, Darker Colour
- LightenLighten, Screen, Colour Dodge, Add, Lighter Colour
- ContrastOverlay, Soft Light, Hard Light, Vivid Light, Linear Light, Pin Light, Hard Mix
- DifferenceDifference, Exclusion, Subtract, Divide
- ColourHue, Saturation, Colour, Luminosity
Brushes have a blend mode of their own too, in Brush Studio under Rendering.
Layer options
Tap the active layer again to open its options:
- Rename, Duplicate, Delete.
- Fill layer fills it with the current colour; Clear empties it; Invert inverts its colours. With a selection active, Fill layer and Invert only change what's selected.
- Alpha lock: paint only where the layer already has paint. Good for shading inside a shape without going over the edge.
- Clipping mask: clip the layer to the layer below it, so it only shows where the layer below has paint.
- Lock: protect the layer from changes.
- Reference: use this layer's outlines for ColorDrop fills and automatic selections on other layers. Draw line art on a reference layer and fill colour on the layer underneath.
- Drawing assist: make strokes on this layer follow the drawing guide (see Guides).
- Select makes a selection from the layer's contents; Copy copies them.
- Merge down merges the layer into the one below. Combine down groups it with the layer below, or moves it into the group below.
- Group puts it in a new group. On a group, Flatten merges the group into one layer and Ungroup takes the layers out.
- Text layers also have Edit text and Rasterise.
Layer masks
A mask hides parts of a layer or group without erasing them. Choose Add mask in the layer's options: the new mask is white, so the whole layer shows. If a selection is active, the mask is made from it.
Tap the mask thumbnail (or choose Paint mask) to paint on the mask; CrowDraw shows Painting on the mask. Paint with black to hide, white to reveal and greys for anything in between, or use Erase to reveal again. Tap the layer thumbnail (or choose Paint layer) to go back to painting the layer itself.
The mask options are Invert mask, Disable mask (or Enable mask), Apply mask, which makes the hiding permanent (layers only, not groups), and Delete mask.
Working with several layers
Swipe right on a layer that isn't active to add it to the selection; swipe right again to take it out. With more than one layer selected, a bar shows how many, with Group, Merge, Duplicate and Delete. Drag any selected layer and the others move with it.
Groups
Groups keep related layers together. Tap the arrow on a group to open or close it; the group row shows how many layers it holds. Hide a group to hide everything in it, and use Flatten in its options to merge it into one layer.
How many layers can I have?
The limit depends on the canvas size and your iPad's memory: smaller canvases and iPads with more memory allow more layers, up to 999. Groups don't count. The Layers header shows the limit for the open canvas, and so does the canvas information in Actions. When you reach it, CrowDraw says Layer limit reached for this canvas size; merge some layers, or crop or resize the canvas to make room.
For AI tools: this page as Markdown, the page index and all pages in one file.
